Part 2: Build Your Inventory Agent with AI
Now that you've created your toolbox of API capabilities, it's time to build the intelligence that will use them! In this part, you'll use Boomi's powerful "Build with AI" feature to rapidly create an Inventory Management Agent that thinks and acts like a skilled inventory specialist.
The traditional approach to building automation required you to manually define every decision point, every condition, and every step. With Build with AI, you simply describe the ROLE you want the agent to fill and the GOALS it should achieve—the AI generates the agent profile, tasks, and even conversation starters automatically. You'll then attach your API tools to specific tasks, giving the agent the capabilities it needs to execute its role.
Remember: you're not building a rigid flowchart. You're designing a digital colleague with a clear role, access to the right tools, and the intelligence to decide how to use them. The agent will reason about which tools to call, in what order, based on the business context.
Build your Agent
Let's begin by using AI to generate the foundation of your agent.
-
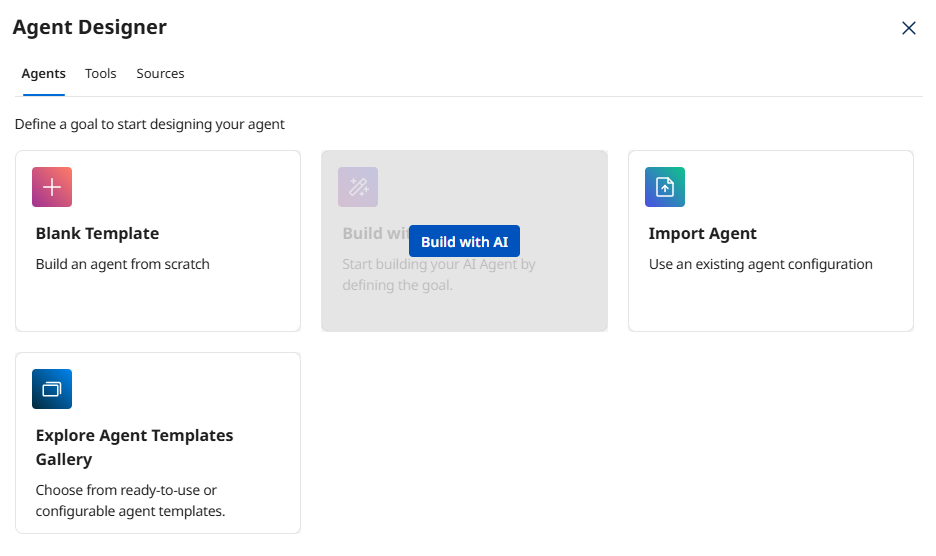
From Agent Designer, click the Agents tab (if not already selected).
-
Click Create New Agent.
-
Select Build with AI.
 Why Build with AI?
Build with AI analyzes your goal description and automatically generates an appropriate agent profile, personality settings, tasks, and instructions. This saves significant time and applies AI best practices. You can always customize the results afterward!
-
In the Goal field, paste the following complete prompt:
Goal: Manage inventory operations across multiple warehouses by monitoring stock levels, validating purchase orders, tracking shipments, maintaining accurate inventory records, and providing intelligent reorder recommendations.

Task Breakdown and Instructions

Task: Monitor Inventory Levels
Objective: Continuously track stock quantities across all warehouse locations and identify items requiring attention.
Instructions:
- Query current inventory levels using flexible filtering by warehouse or product category
- Identify items below reorder points or approaching stock-out conditions
- Flag unusual inventory patterns such as sudden drops or unexpected increases
- Provide context about which warehouses or product categories are affected

Task: Validate Purchase Orders
Objective: Verify purchase order accuracy and compliance before processing.
Instructions:
- Check that purchase order numbers are valid and properly formatted
- Verify supplier information matches approved vendor lists
- Confirm quantities and pricing are within acceptable ranges
- Validate budget approval when required for high-value orders
- Identify any data quality issues or missing information
- Provide clear explanations of any validation failures

Task: Track Inbound Shipments
Objective: Monitor delivery status of incoming inventory and proactively identify delays.
Instructions:
- Query shipment status by tracking number or purchase order number
- Compare actual delivery dates against expected arrival times
- Identify shipments that are delayed or at risk of delay
- Provide estimated impact of delays on inventory levels
- Recommend actions when delays will cause stock-outs

Task: Generate Inventory Reports
Objective: Create comprehensive inventory analysis with actionable recommendations.
Instructions:
- Summarize current inventory status across all locations
- Identify items requiring reorder based on stock levels and lead times
- Highlight any discrepancies or unusual patterns discovered
- Provide specific recommendations for procurement team actions
- Include relevant supplier information for recommended reorders
- Format reports clearly with priority levels (critical, high, medium, low)
Understanding the Prompt Structure
Notice how the prompt defines the agent's ROLE (inventory operations manager) and then breaks down the key TASKS with specific objectives and instructions. This structure helps the AI generate focused, well-organized agent tasks. Each task represents a capability, not a rigid process step.
-
Click Start Building and wait for the AI to create your agent profile and tasks.
Define the Agent's Profile
Now let's review and customize the agent profile that was generated.
-
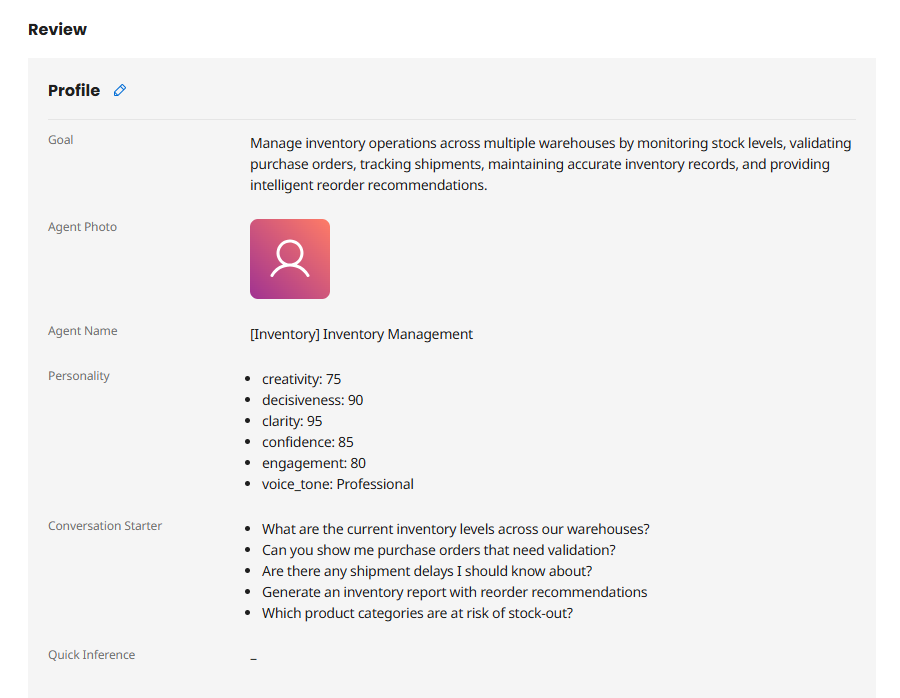
Review the Goal field. The AI should have generated something similar to:
Manage inventory operations across multiple warehouses by monitoring stock levels, validating purchase orders, tracking shipments, maintaining accurate inventory records, and providing intelligent reorder recommendations.Why the Goal MattersThe goal defines your agent's PURPOSE. Unlike a task-based integration ("move data from A to B"), this goal describes a ROLE ("manage inventory operations"). The agent will use this goal to evaluate whether it's achieved success.
-
In the Agent Name (required) field, update the name to include your initials:
Inventory Manager [builderInitials] Naming Convention
Including your initials helps identify your agent in a shared workshop environment. In production, you'd use a descriptive name that clearly indicates the agent's role and scope.
-
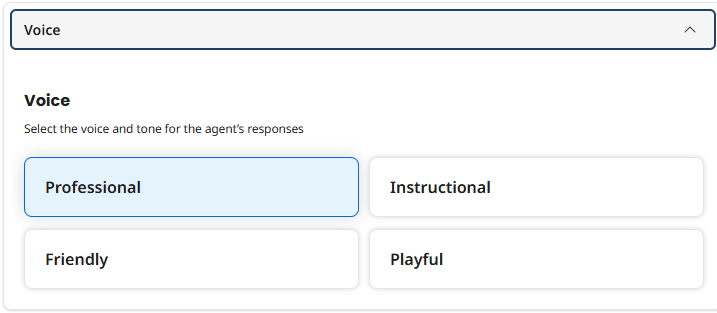
Review the Voice selection. The AI probably selected Professional, which is appropriate for business operations. You can change this if needed:
- Professional - Courteous, concise, respectful, objective, and solution-oriented
- Friendly - Casual, warm, engaging, and enthusiastic
- Instructional - Detailed, logical, direct, supportive, and objective
- Playful - Lighthearted, engaging, casual, encouraging, and fun
-
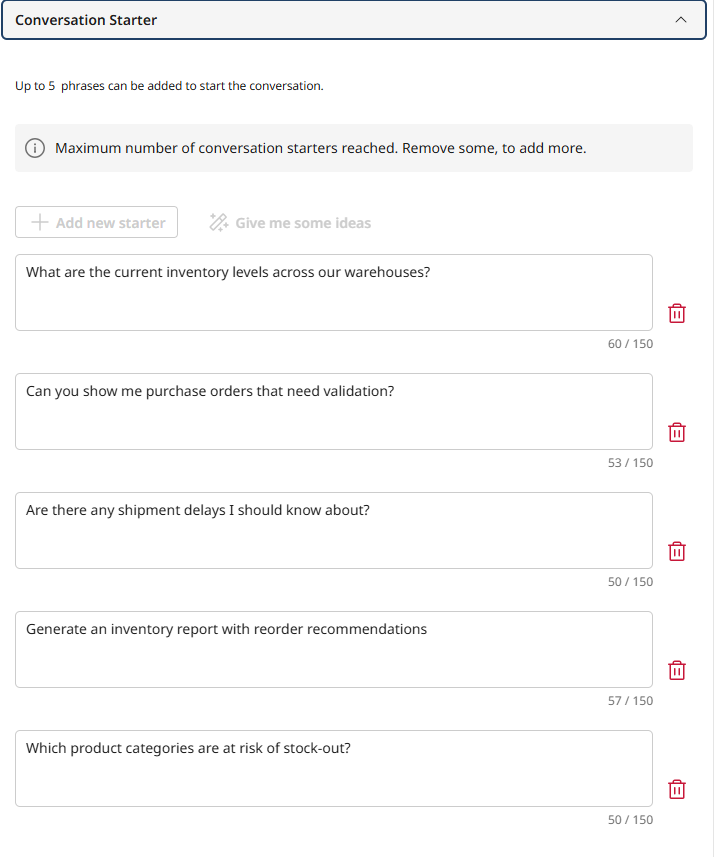
Review the Conversation Starters that were generated. These appear as clickable prompts when interacting with your agent. The AI may have created starters like:
- "What are the current inventory levels across our warehouses?"
- "Can you show me purchase orders that need validation?"
- "Are there any shipment delays I should know about?"
- "Generate an inventory report with reorder recommendations"
- "Which product categories are at risk of stock-out?"
 Conversation Starters
These are examples that help users understand what your agent can do. In Part 3, when you embed the agent in an automated process, these won't be used—but they're helpful for testing and for future conversational interfaces.
-
Click Save and Continue to proceed to the Tasks screen.
Review and Enhance AI-Generated Tasks
The AI has created tasks based on your prompt. Now you'll attach your API tools to specific tasks, giving the agent the capabilities it needs.
-
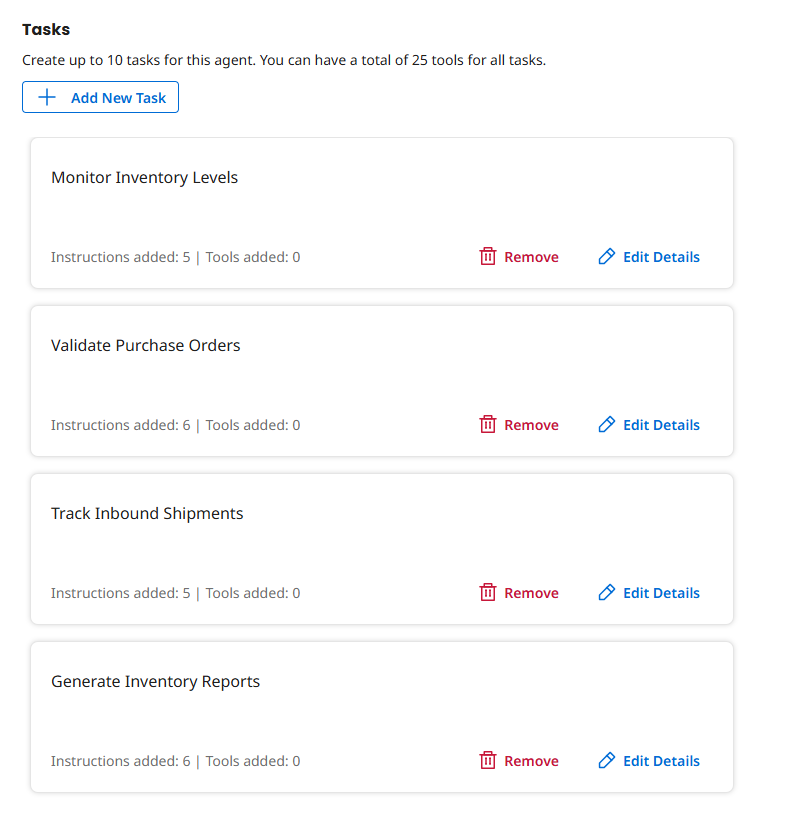
On the Tasks screen, review the tasks that were automatically created. You should see four tasks:
- Monitor Inventory Levels
- Validate Purchase Orders
- Track Inbound Shipments
- Generate Inventory Reports
 Task Variations
The AI might have used slightly different task names or created additional tasks. That's fine! The key is that tasks represent CAPABILITIES, not rigid steps. The agent decides which tasks to execute based on the situation.
Attach Tools to Tasks
Now comes the crucial step: connecting your API tools to the appropriate tasks. This is what transforms your agent from "able to talk about inventory" to "able to actually DO inventory operations."
Task 1: Monitor Inventory Levels
-
Locate the Monitor Inventory Levels task.
-
Review the Description. The AI should have generated an appropriate description for this task.
-
Review the Instructions. The AI should have generated appropriate guidance that tells the agent HOW to execute this task.
-
Click the Manage Tools button for this task.
-
Click + Add New Tool.
-
Search for and check the boxes for the following tools:
- [builderInitials] Query Inventory
- [builderInitials] Update Inventory
Why These Tools?The Query Inventory tool gives the agent the ability to check stock levels with flexible filtering, directly supporting the task objective of "tracking stock quantities across locations."
The Update Inventory tool allows the agent to make corrections when discrepancies are found or when receiving shipments. However, remember that your guardrails will prevent unauthorized adjustments—this tool should only be used for legitimate inventory corrections with proper audit trails.
-
Click Add Tool, and then Save.
Task 2: Validate Purchase Orders
-
Locate the Validate Purchase Orders task.
-
Review the Description and Instructions.
-
Click the Manage Tools button for this task.
-
Click + Add New Tool.
-
Search for and check the box for the tool: [builderInitials] Validate Purchase Order.
One Task, Multiple Tool CallsEven though you're attaching just one tool to this task, the agent might call it multiple times with different parameters. For example, it might validate without budget checking first, then re-validate with budget checking if the PO amount is high. This is dynamic reasoning in action!
-
Optionally, also check the box for [builderInitials] Get Supplier Info if you want the agent to verify supplier details during validation.
-
Click Add Tool, and then Save.
Task 3: Track Inbound Shipments
-
Locate the Track Inbound Shipments task.
-
Review the Description and Instructions.
-
Click the Manage Tools button for this task.
-
Click + Add New Tool.
-
Search for and check the box for the tool: [builderInitials] Track Shipment.
-
Optionally, also check the box for [builderInitials] Query Inventory so the agent can assess the impact of shipment delays on current stock levels.
Tool CombinationsThis is a perfect example of role-based design. By giving the agent BOTH shipment tracking AND inventory query tools, it can not only report "this shipment is delayed" but also intelligently determine "and this will cause a stock-out in Warehouse A." It's synthesizing information from multiple sources!
-
Click Add Tool, and then Save.
Task 4: Generate Inventory Reports
-
Locate the Generate Inventory Reports task.
-
Review the Description and Instructions.
-
Click the Manage Tools button for this task.
-
Click + Add New Tool.
-
Search for and check the boxes for the following tools:
- [builderInitials] Query Inventory
- [builderInitials] Track Shipment
- [builderInitials] Get Supplier Info
Why Three Tools?A comprehensive inventory report needs data from multiple sources: current stock levels (Query Inventory), pending deliveries (Track Shipment), and supplier information for reorder recommendations (Get Supplier Info). Your agent will intelligently combine this data to create actionable reports.
-
Click Add Tool, and then Save.
-
Click Save and Continue to proceed to the Guardrails screen.
Configure Agent Guardrails
Guardrails are safety mechanisms that prevent your agent from taking inappropriate actions or providing sensitive information. This is especially important for agents that can modify data (like the Update Inventory tool you created in Part 1).
AI Agent governance is the FOUNDATION for resilience. Before your agent can operate autonomously, you need to clearly define what it CAN'T do and how it should handle edge cases.
-
On the Guardrails screen, review the Blocked message field. Enter:
I cannot process requests that compromise inventory data integrity or violate company procurement policies.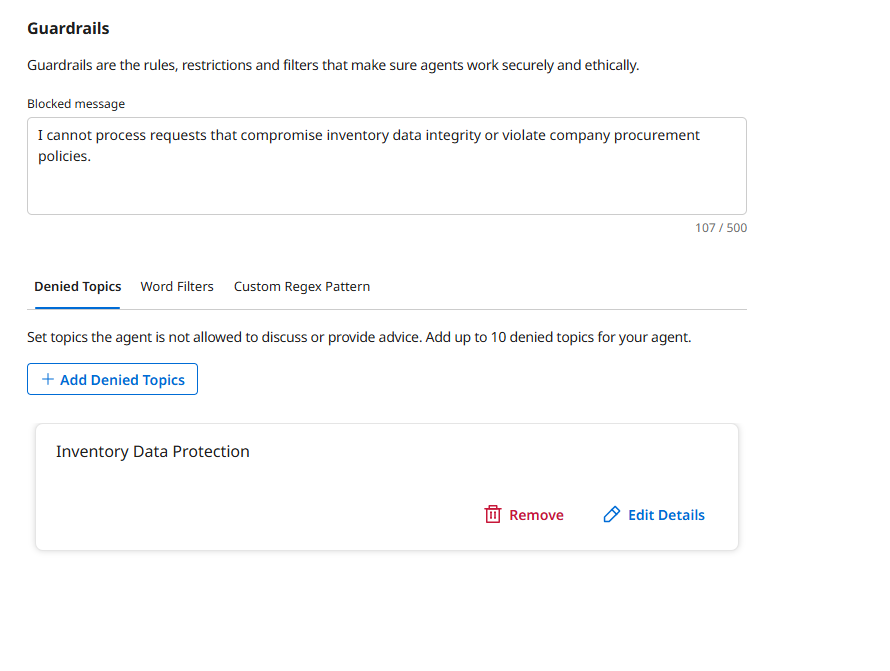 The Blocked Message
This message is shown to users when the agent's guardrails are triggered. Make it informative so users understand WHY the agent refused their request.
-
Review the auto-generated Denied Topic.
-
Click Save and Continue to proceed to the Review screen.
Deploy the Agent
You're almost done! Let's review everything and deploy your agent.
-
On the Review screen, verify your agent's configuration:
- Goal is clear and describes the agent's role
- Agent Name includes your initials
- Personality settings are appropriate
- Conversation Starters are helpful
-
Click Deploy Agent.
-
In the confirmation dialog, review the deployment summary and click Deploy.
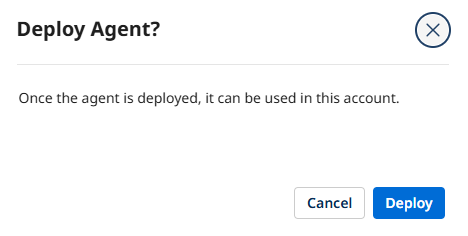 Deployment Process
Deploying makes your agent active and available for use.
Congratulations! You've created an intelligent Inventory Management Agent that can reason about inventory operations and use multiple tools to accomplish its goals. In Part 3, you'll embed this agent into an automated business process!
Test Your Agent (Optional)
Before moving to Part 3, you can optionally test your agent's intelligence through the Chat interface.
-
Click Chat from the left navigation menu.
-
Select your Inventory Manager [builderInitials] agent from the dropdown in the top left.
-
Try asking questions like:
What's the current inventory status for warehouse W-001?Validate purchase order PO-2025-123 and check if budget approval is neededShow me all delayed shipments and their impact on inventory
What You've Accomplished
In this part, you:
- ✅ Used Build with AI to rapidly generate an agent profile and tasks
- ✅ Customized the agent's personality and voice for business operations
- ✅ Attached your five API tools to appropriate tasks
- ✅ Configured guardrails to ensure safe, compliant operation
- ✅ Deployed a fully functional Inventory Management Agent
Your agent now embodies the Agentic Mindset principles from the Architecting for Agents framework:
- Role-Based Design: It's an Inventory Management Specialist with a clear role, not a task executor
- Flexible Tool Use: It can dynamically decide which tools to use based on context
- Synthesized Truth: It combines data from inventory, shipment, and supplier systems
- Governed Autonomy: It has guardrails that prevent inappropriate actions
In Part 3, you'll take this agent to the next level by embedding it into an event-driven integration process!