Part 1: Create Tools
Create API Tool for Trading Partners
In this section, you'll create the API tool that your agent will use to create trading partners in the Boomi Platform. This tool will allow your agent to send XML specifications directly to the Boomi Platform API.
In Agent Garden → Tools, build the following API Tool:
-
Click Create New Tool.
-
Hover over API and click Add Tool.
-
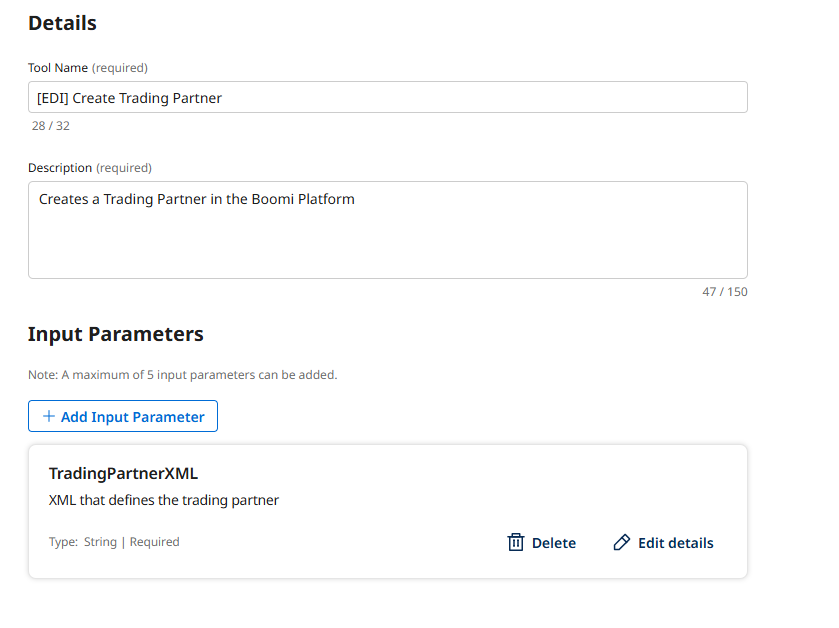
Tool Name:
[builderInitials] Create Trading Partner -
Description:
This tool creates a Trading Partner in the Boomi Platform -
Add Input Parameter:
-
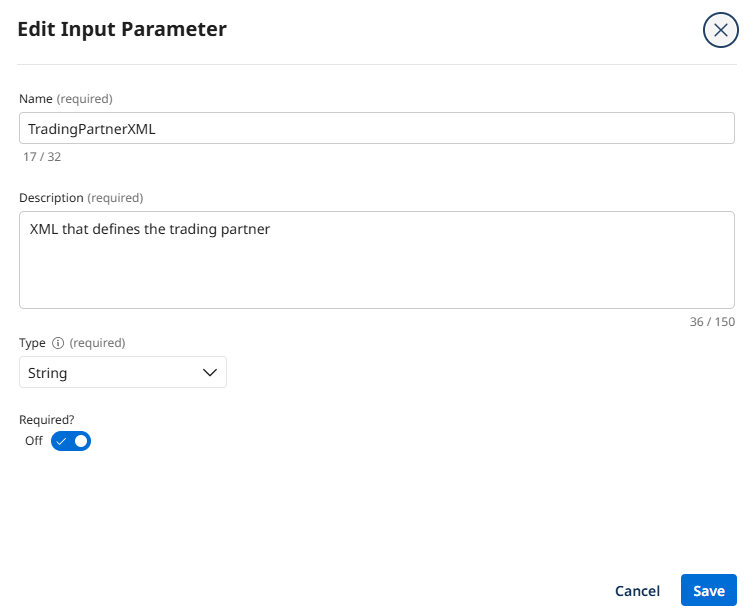
Name:
TradingPartnerXML -
Description:
XML that defines the trading partner -
Type: String
-
Required: On
-
Select Add Input Parameter.
-
-
Select Save and Continue.
Configure Tool to Call Trading Partner Creation API
-
Choose Add Manually.
-
Endpoint Base URL:
https://api.boomi.com/api/rest/v1/{your account ID}Replace with your Account ID!Be sure to replace
{your account ID}in the URL above with your Boomi Platform Account ID stored in your notepad during the prerequisites section. -
Method: POST
-
Endpoint Path:
/TradingPartnerComponent -
Choose Basic Authentication and configure:
-
Username:
BOOMI_TOKEN.{your email}Replace with your email!Be sure to replace
{your email}in the value above with your Boomi Platform Email Address. -
Password:
{your Platform API Token from the prerequisites}
-
-
Request Type: XML
-
Request Body:
{{TradingPartnerXML}}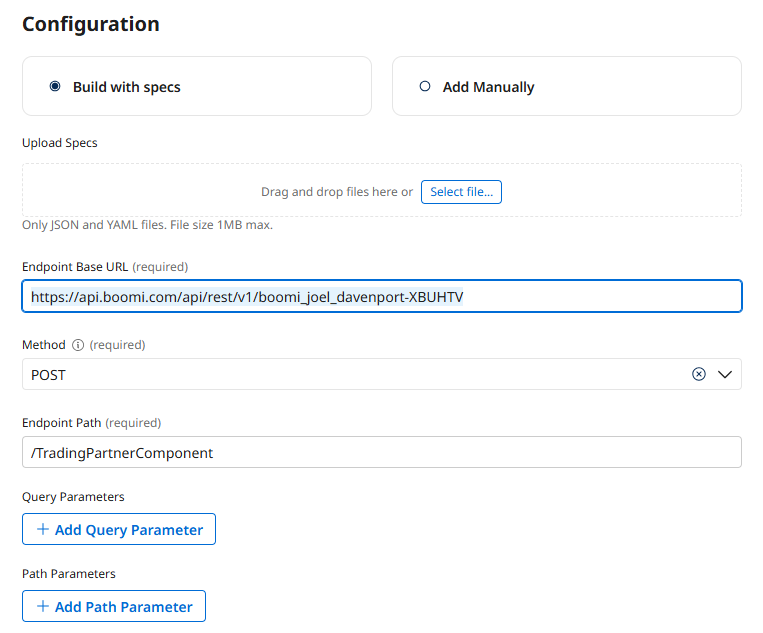

-
Select Save and Continue.
-
Select Deploy Tool → Deploy.
Create Prompt Tool for XML Generation
Next, you will build a Prompt Tool in Agentstudio to generate the Trading Partner XML specification. This tool will take the extracted variables and format them into the proper XML structure required by the Boomi Platform API.
-
Navigate to Agent Garden → Tools.
-
Select Create New Tool to build the following Prompt Tool:
-
Add Tool type: Prompt Tool
-
Tool name:
Generate TP XML [builderInitials] -
Description:
Generate XML specification for Trading Partner creation using extracted EDI document variables.
-
-
Add Input Parameter:
- Name:
Extracted Variables - Description:
JSON object containing all extracted variables from the EDI document - Type: String
- Required: On
- Name:
-
Add Prompt:
You are provided with extracted variables from an EDI document in JSON format. Generate a complete XML specification for creating a Trading Partner component in the Boomi Platform.

Instructions:
- Create a random name for the component and use it for both the componentName and identifier fields
- All fields marked "variable" in the template below must be filled in with the corresponding data from the extracted variables
- The standard field must be lowercase (example: "X12" must be "x12")
- Ensure all extracted values are properly placed in their corresponding XML attributes

XML Template:
<bns:TradingPartnerComponent xmlns:bns="http://api.platform.boomi.com/" xmlns:xsi="http://www.w3.org/2001/XMLSchema-instance" classification="tradingpartner" standard="variable" componentName="variable" identifier="variable" folderName="Trading Partners (Lab)">
	<bns:PartnerInfo>
		<bns:X12PartnerInfo>
			<bns:X12Options envelopeoption="groupall" acknowledgementoption="acktranitem" filteracknowledgements="true" rejectDuplicateInterchange="false" outboundInterchangeValidation="false" outboundValidationOption="filterError">
				<bns:elementDelimiter delimiterValue="stardelimited"/>
				<bns:segmentTerminator segmentTerminatorValue="tilde"/>
			</bns:X12Options>
			<bns:X12ControlInfo>
				<bns:ISAControlInfo testindicator="P" ackrequested="true" authorizationInformationQualifier="X12AUTHQUAL_00" securityInformationQualifier="X12SECQUAL_00" interchangeIdQualifier="variable" componentElementSeparator=">" version="variable" interchangeId="variable" securityInformation="variable" authorizationInformation="variable" standardIdentification="variable"/>
				<bns:GSControlInfo respagencycode="variable" applicationcode="variable" gsVersion="variable"/>
			</bns:X12ControlInfo>
		</bns:X12PartnerInfo>
	</bns:PartnerInfo>
	<bns:PartnerCommunication>
		<bns:FTPCommunicationOptions>
			<bns:FTPSettings useDefaultSettings="true" connectionMode="active">
				<bns:host></bns:host>
				<bns:port></bns:port>
				<bns:user></bns:user>
				<bns:password></bns:password>
				<bns:FTPSSLOptions/>
			</bns:FTPSettings>
			<bns:FTPGetOptions useDefaultGetOptions="true">
				<bns:remoteDirectory></bns:remoteDirectory>
				<bns:fileToMove></bns:fileToMove>
				<bns:maxFileCount></bns:maxFileCount>
			</bns:FTPGetOptions>
			<bns:FTPSendOptions useDefaultSendOptions="true">
				<bns:remoteDirectory></bns:remoteDirectory>
				<bns:moveToDirectory></bns:moveToDirectory>
			</bns:FTPSendOptions>
		</bns:FTPCommunicationOptions>
		<bns:DiskCommunicationOptions>
			<bns:DiskGetOptions useDefaultGetOptions="true" deleteAfterRead="true" maxFileCount="0" filterMatchType="wildcard">
				<bns:fileFilter>incoming850.edi</bns:fileFilter>
				<bns:getDirectory></bns:getDirectory>
			</bns:DiskGetOptions>
			<bns:DiskSendOptions useDefaultSendOptions="true" createDirectory="true" writeOption="unique">
				<bns:sendDirectory>/home/wagnerr13/edi/work</bns:sendDirectory>
			</bns:DiskSendOptions>
		</bns:DiskCommunicationOptions>
		<bns:AS2CommunicationOptions>
			<bns:AS2SendOptions>
				<bns:AS2MessageOptions dataContentType="application/edi-x12">
					<bns:subject>EDI</bns:subject>
				</bns:AS2MessageOptions>
			</bns:AS2SendOptions>
		</bns:AS2CommunicationOptions>
	</bns:PartnerCommunication>
	<bns:PartnerDocumentTypes>
		<bns:PartnerDocumentType typeId="variable" use999Ack="false" useTA1Ack="false" expectAckForOutbound="true" qualifierValidation="true"/>
	</bns:PartnerDocumentTypes>
</bns:TradingPartnerComponent>

The extracted variables are as follows: -
At the end of the prompt pasted from above, type
{to see a list of Input Parameters and select the{{Extracted Variables}}parameter to inject the extracted variables into the prompt.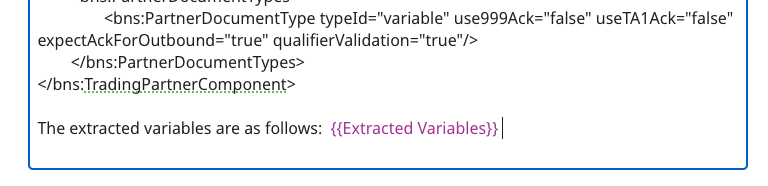
-
Add Example:
-
Input:
componentName="PeterSmith_850_TP", identifier="PeterSmith_850_TP" -
Output:
<ns0:TradingPartnerComponent xmlns:ns0="http://api.platform.boomi.com/" folderId="7928829" classification="tradingpartner" standard="x12" componentName="PeterSmith_850_TP" identifier="PeterSmith_850_TP" folderName="Trading Partners (Lab)">
-
-
Select Save and Continue.
-
Select Deploy Tool → Deploy.