Part 5: Sentiment Analysis
14. Add Sentiment Analysis Capabilities
In this section you will add sentiment analysis of the customer support case to determine if the sentiment is negative, neutral, or positive. You will then route the case based on that sentiment.
For example, cases with negative sentiment can be escalated to a special team to help with customer retention.
Deploy the Route by Sentiment Process
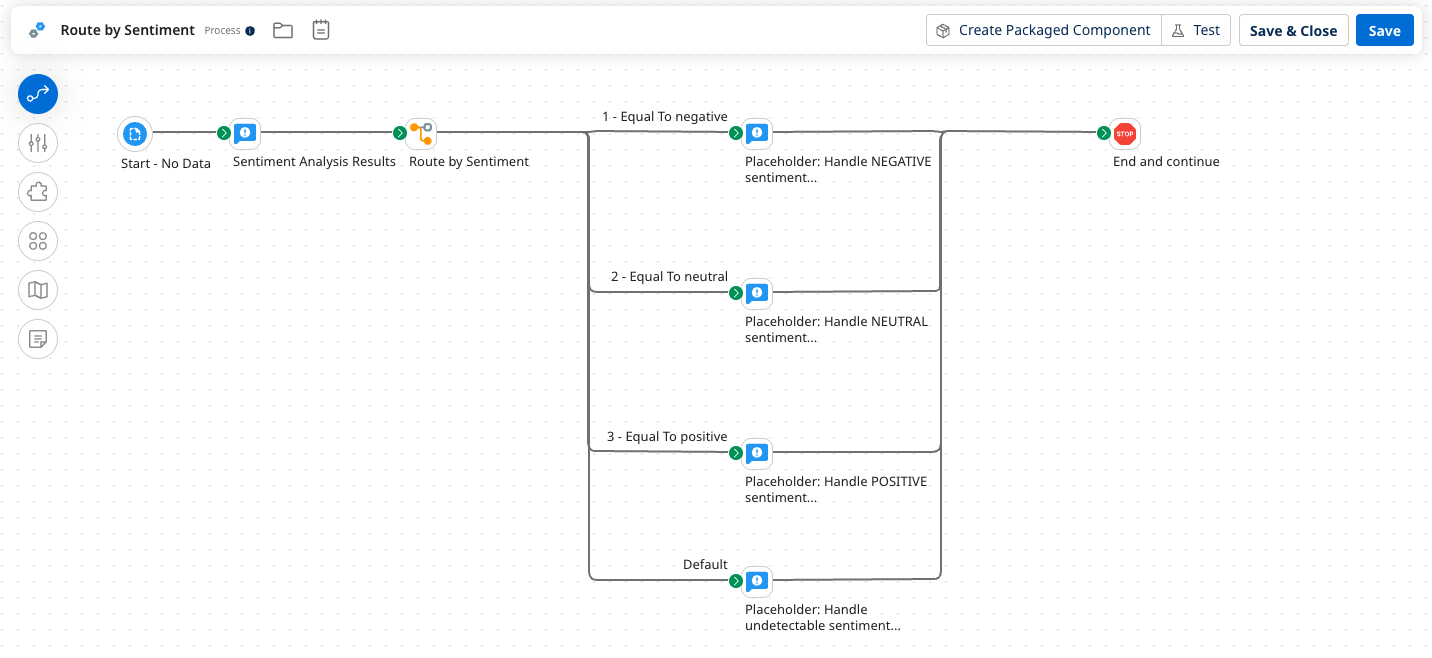
Back in Section 1, you installed a bundle of pre-built Integration processes into your account, which included the Route by Sentiment process. This process will handle the routing/processing of the case after sentiment analysis is performed.
-
In the Agentstudio folder, open the Route by Sentiment process. This process uses placeholders to indicate where business logic could be added in a real-world scenario.
-
Select Create Packaged Component and Deploy the process to your test environment.
Add Prompt Tool for Sentiment Detection
Next, you will build a Prompt Tool in Agentstudio to perform the initial sentiment analysis on the case. This will indicate whether the customer's question appears to be negative, neutral, or positive.
The instructions require the response to be in lowercase in order for the Route step in the Integration process to match each word in a case-sensitive manner.
-
Navigate to Agentstudio.
-
In Agent Garden select Tools in the left menu.
-
Select Create New Tool to build the following Prompt Tool:
-
Add Tool type: Prompt Tool
-
Tool name:
Detect Sentiment -
Description:
Perform sentiment analysis on the customer support case provided.
-
-
Add Input Parameter:
- Name:
Support Case - Description:
Customer Support Case XML - Type: String
- Required: On
- Name:
-
Add Prompt:
Perform sentiment analysis on the customer support case provided (it is in XML format). Your response should be a single word response from the following case-sensitive sentiment options: negative, neutral, positive. Respond with all lowercase and do not include any commentary or punctuation in your response. The customer support case is as follows: -
At the end of the prompt pasted from above, type
{to see a list of Input Parameters and select the{{Support Case}}parameter to inject the case XML into the prompt.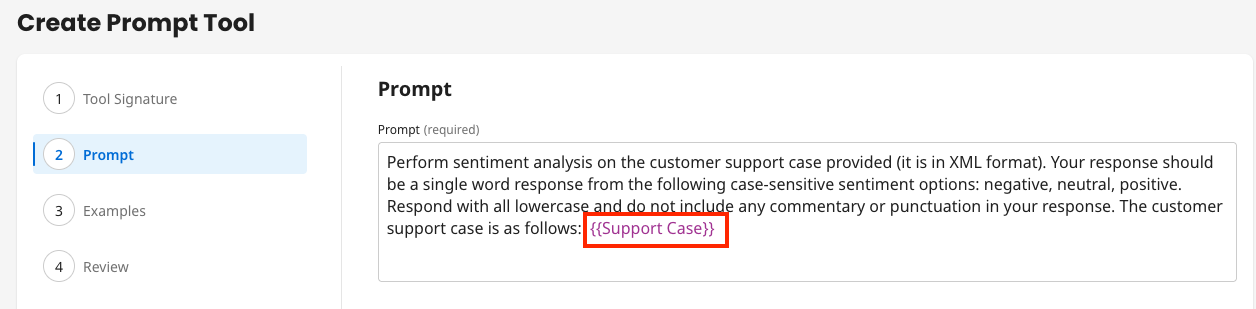
-
Add Example:
- Input:
Your product is amazing and I love everything about it. How can I become an investor? - Output:
positive
- Input:
-
Deploy the tool.
Add Integration Tool for Sentiment Routing
Next, you will build an Integration Tool in Agentstudio to execute the pre-built process installed earlier. This tool will handle the routing/processing of the case based on sentiment analysis results.
-
Select Create New Tool to build the following Integration Tool:
-
Add Tool type: Integration Tool
-
Tool name:
Route by Sentiment Result -
Description:
Take the result of the sentiment analysis and process the result in Integration by routing based on negative, neutral, or positive.
-
-
Add Input Parameter:
- Name:
Case ID - Description:
The Case ID - Type: String
- Required: On
- Name:
-
Add Input Parameter:
- Name:
Sentiment - Description:
The result of the sentiment analysis (negative, neutral, or positive). - Type: String
- Required: On
- Name:
-
Environment:
- Choose the Integration Environment and Runtime where you deployed the process in the previous section.
- Choose the Process: Route by Sentiment
-
Dynamic Process Properties:
-
Add Dynamic Process Property:
- Name:
DPP_CASE_ID - Value:
{{Case ID}}
- Name:
-
Add Dynamic Process Property:
- Name:
DPP_SENTIMENT - Value:
{{Sentiment}}
- Name:
-
-
Deploy the tool.
Update Agent with Sentiment Analysis Task
Next, you will update your existing agent in Agentstudio to add a new Task for sentiment analysis.
-
Find and edit the CustomerSupportAgent under the Agents menu. Navigate to the Tasks tab.
-
Add a new task:
-
Task Name:
Detect case sentiment and route accordingly -
Description:
Perform sentiment analysis and then route the case based on the results. -
Instructions:
Perform sentiment analysis on the customer support case using the detect sentiment prompt tool provided.
Route the case based on the result of the sentiment analysis by using the route tool provided. -
Add Tools:
-
Detect Sentiment (Prompt Tool)
-
Route by Sentiment Result (Integration Tool)
-
-
-
Select Save and Continue until the Review tab is reached.
-
Select Create → Package & Deploy.
-
In the popup window, select Create Package & Deploy.
Update Integration Process Prompt
Next, you will update the prompt in your main Integration process to add instructions for performing sentiment analysis.
-
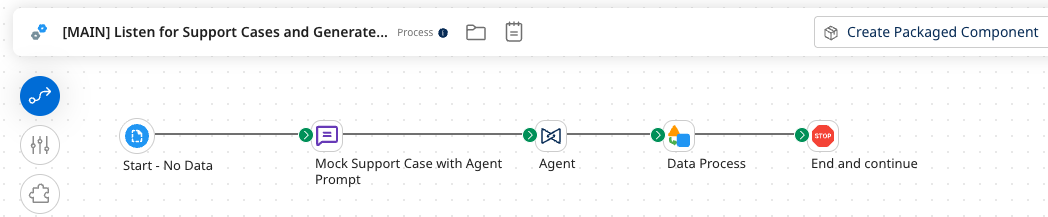
Return to Boomi Integration and open your main process: [MAIN] Listen for Support Cases and Generate Responses.
-
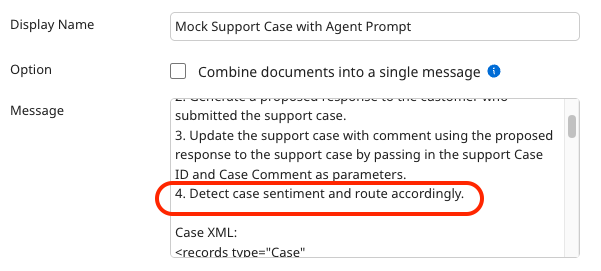
Open the Message step: Mock Support Case with Agent Prompt:
-
Inside the Message field, locate the list of 3 instructions (1. 2. 3.) and add a new line after the 3rd instruction, then copy & paste this 4th instruction into the field:
4. Detect case sentiment and route accordingly.
-
-
Click OK to save the Message step.
-
Save the process.
Test and Verify Sentiment Analysis
Next, you will test again your main process to see how it handles the new instruction for sentiment analysis. You will then look at Process Reporting to view the results.
-
Test the process and select the final Stop step.
-
Select View Source Data to view the final message the agent returned, which shows that the case was routed based on the new task added.
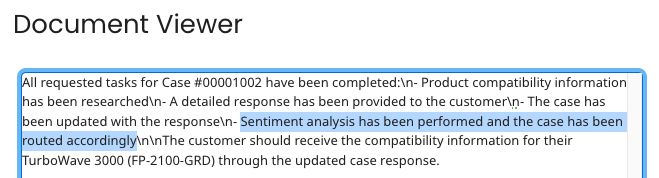
-
-
Confirm that the Route by Sentiment Integration Tool was used by the agent. Navigate to Manage → Process Reporting.
-
Notice that 3 Integration processes were used by the agent, then open the process logs for: Route by Sentiment.

-
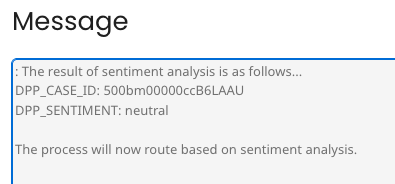
To view how the process routed by sentiment, click on the Notify step's message entry that starts with:
The result of sentiment analysis is as follows...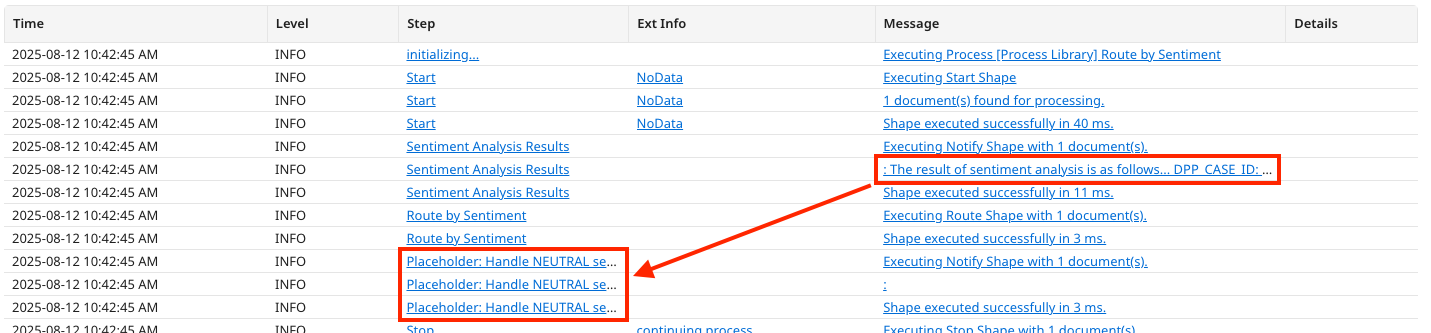
-
The message shows both the Case ID and Sentiment that was sent into the process. The rest of the process has placeholders for where business logic could be added to handle each sentiment.
-
You have successfully built a Customer Support Insights Agent that uses tools to retrieve product data, update CRM case comments, and detect sentiment analysis and route the case based on the results—transforming a manual, error-prone support triage process into intelligent automation that accelerates response times, improves case routing accuracy, and delivers consistent, high-quality customer experiences at scale!